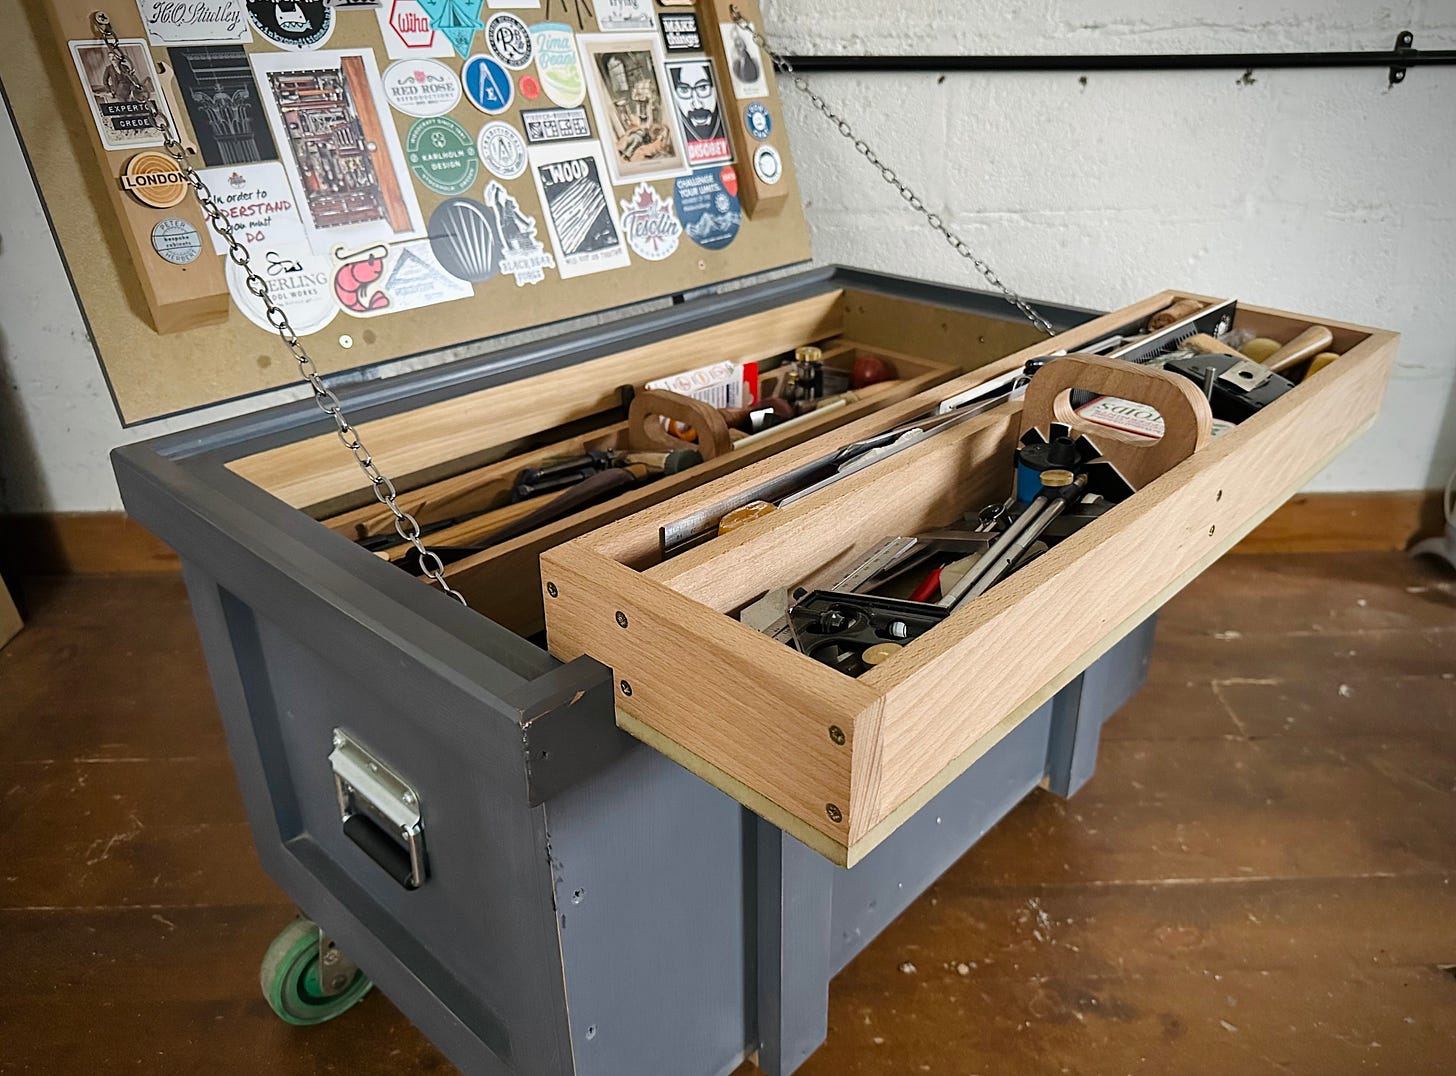
A few people have commented on my tool chest, which has appeared around the edges of a few recent photos. It has some interesting features which I thought I would write about. Chris Schwarz has written at length on tool chests, most notably in his book The Anarchists Tool Chest. As you know, I’m here to squeeze the pips and get to the very essence of things. And I’m sure Chris won’t mind me squeezing his pips, provided I warm my hands first. Here we go, let’s get reductive.
reductionist
[often derogatory]
noun. A person who analyses and describes a complex phenomenon in terms of its simple or fundamental constituents. “a crude reductionist”

The Anarchist’s Tool Chest is a metaphor. It’s about the idea of gathering together the essential tools, then making things until you die. If you want, break free from the bonds of your oppressors, stab them in the eye with your Lie-Nielsen 1/8” chisel and make democratic furnishings to your own taste forever after. If the Anarchist’s Tool Chest were a Venn Diagram, it would be the universal set that contains all other sets (at least as far as the essential hand tools are concerned). No-one was meant to actually make the chest, it was just a vehicle to contain the idea. Except lots of people did make it, and for good reason. We all need a place to put our shit. For me that was where The Reductionist’s Tool Chest came in*.
*in case anyone thinks I’m poking fun or denigrating the message of The ATC, think again. Chris and I are friends and trading partners (by which I mean we do business together, not that we are into wife swapping). I read The ATC when it was first published and think it is one of the truly seminal woodworking books of modern times. It changed the way I think about things forever. The vomit coloured, signed first edition is one of my prized possessions. The fact that this book enabled Lost Art Press to become what it is today is something we should all be grateful for. I’m not just saying that because I know Chris will read it. This praise will make him want to claw out the eyes he reads it with.

In the Summer of 2014 I booked myself onto a Dutch Tool Chest course with Chris Schwarz. Truth be told I didn’t really need a tool chest, but I wanted to meet Chris and spend some time in the presence of other likeminded woodworkers. I also wanted to support the new venture that Derek Jones had launched to bring eminent woodworkers to the UK to teach. I thought this was a thoroughly good thing. My only issue was not having a suitable travelling toolbox. As a static woodworker in a nice shop I didn’t have the need to move my stuff about, so it was on shelves and in cupboards. The irony of making a tool chest to travel to a tool chest making course is not lost on me. It is possibly the most meta thing ever.
Incidentally, I wrote about the course here. There’s also a nice video on the same link that gathers together all of my Instagram stories showing the steps in making the Dutch Tool Chest. It’s enough to give you the general gist of the process.
So I made a tool chest of necessity, using the materials at hand. There were a few criteria I needed it to meet. It had to fit in the car. It didn’t need to hold all my tools, just those needed for the course. It needed to be capable of being lifted by one person. And it had to be relatively quick to make. I knocked this out in two days. After the course, the chest sat empty for many years. More recently I’ve loaded my core set of tools into it and I’m currently working out of it as an experiment. Let’s be clear - it will not fit everything that goes in an ATC, but it will contain the most vital elements.
Every name has to be shortened these days, so let’s call this chest the RTC. Perhaps no coincidence that those initials also stand for Road Traffic Collision. Some of you may consider this chest a bit of a car crash. But I bet you can’t stop looking at it as you go by.
Let’s tackle a key feature of this chest, and potential elephant in the room. It uses sheet materials. Whether you like them or not, they can be a very material-efficient way of constructing box-like objects. Their primary shortcoming is the weakness of what I’ll call, for want of a better term, their end grain. MDF wants to split when you screw into the thin axis. Plywood is a little better, but not much. This design uses solid wood at the key fixing and load points where it’s needed and just the thin sheet material where it isn’t. Where I could, I made the solid wood elements do double duty, so for example the batten that the lift handles fix to is also the runner the tills slide on. The battens that help the lid stay flat and rigid are also the fixing points for the hinges and hasps.
In my case I used 12mm Moisture Resistant (MR) MDF, but plywood would be equally suitable. My choice was largely based on what I had at hand. I used Tulipwood (Poplar) for the battens and cleats, but any timber would work. Mostly the solid timber is in a 2X1 format, so you could pretty well make this with materials picked up from a home centre. The trays are made of CND Beech. This is wood cut from trees that supported nuclear disarmament before they were felled. I believe some timber merchants also use the term to refer Colour, No Defects. I prefer to get the non-nuclear one when I can.
In a traditional chest, as with the ATC, sliding tills are used to contain all the small tools and items that need a home. To allow all the tills and the items in the base to be accessed, a clear void is required within the chest. That has always struck me as an inefficient use of space so with the RTC I took a different route. I still wanted two tills, but the smaller format of the chest made arranging one above the other a problem. I came up with a design where they sat side by side and one of the tills could be lifted out and hooked onto the front of the chest. This allows the remaining till to be slid back and forth to access the tools in the base of the chest. Genius right? Actually you can also remove and hook the second till to the edge of the open lid, but I rarely do this. My till design allows one of them to be lifted past the other to get it out of the box. The rear till has a clear space at the back to allow it to slide right up to the chisel storage at the rear. The other has a slim slot-like section for pencils and rulers, which again was something I saw as lacking in traditional chests. Both tills have an integrated lifting handle that further serves to subdivide the space into two areas.

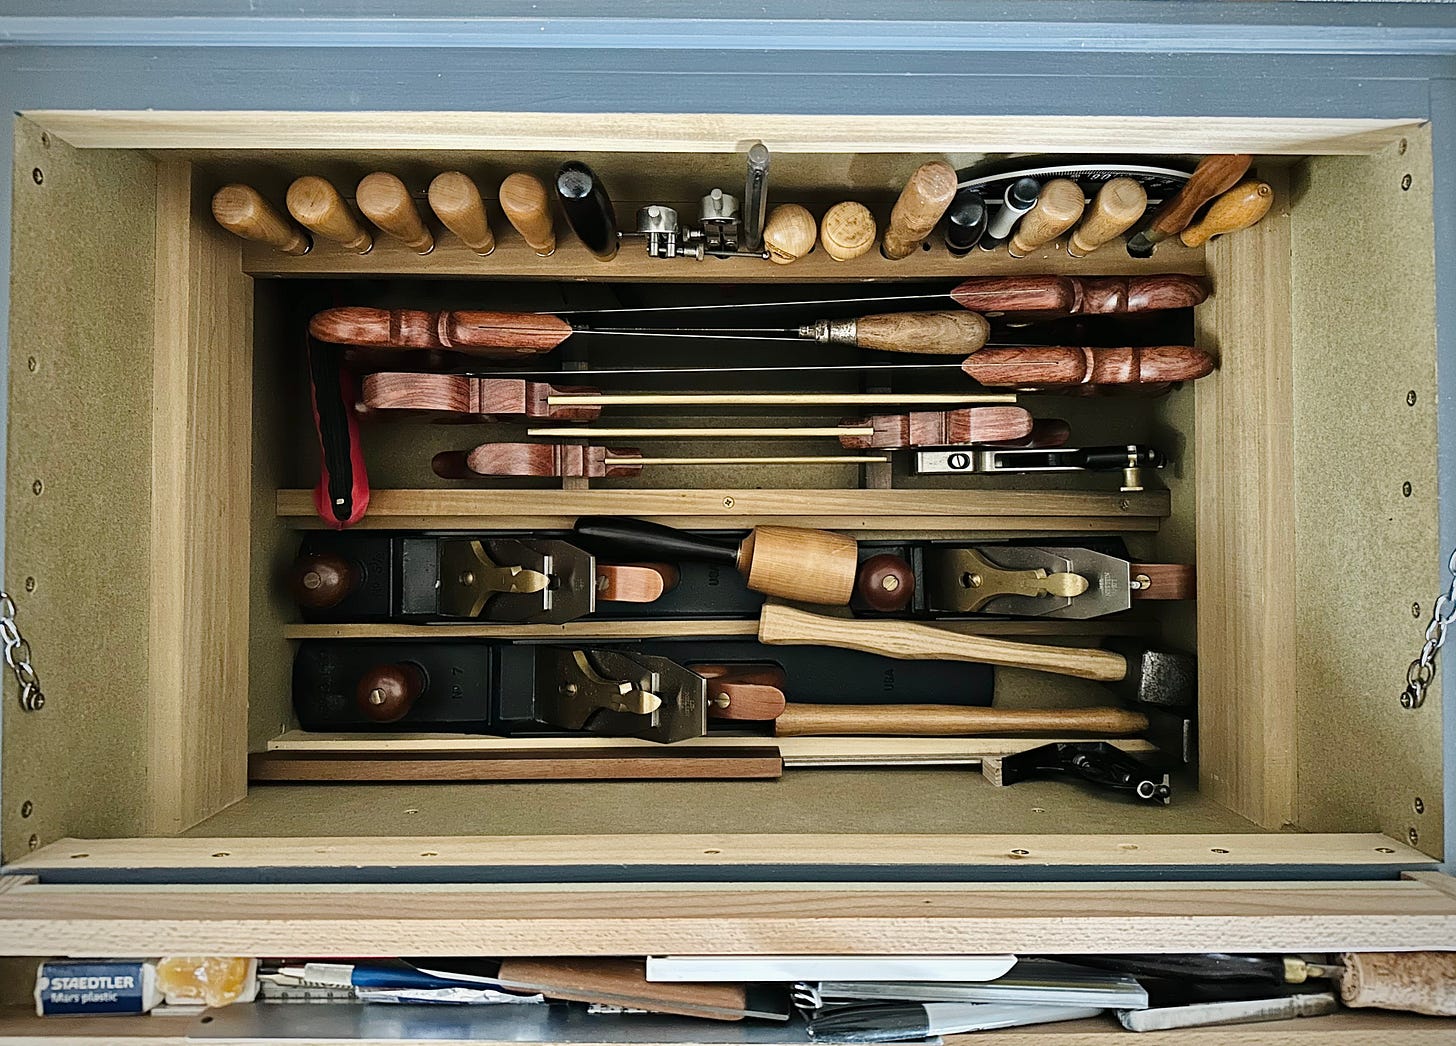
At the rear the chest is a tool holder for chisels and other like tools, such as screwdrivers and awls. The base of the chest has a saw holder which contains 3 panel saws and 3 backsaws. In addition there is space to store a jointer plane, jack plane and smoothing plane at the front. Hammers, mallets and a shoulder plane drop into the various bits of leftover space.

I added the castors as an afterthought. What I now realise is they make a huge difference to the flexibility with which you can use a chest, moving it to suit the current operation. In future I will design in castors, although I’m not sure that would greatly alter anything here. These ones are recycled from an old Tesco delivery cage, but you can buy similar from new. The lift handles were sourced from a flight case parts supplier. It’s worth noting these companies are a good source of very robust chest hardware, provided you don’t mind the more industrial appearance. Me, I like it.
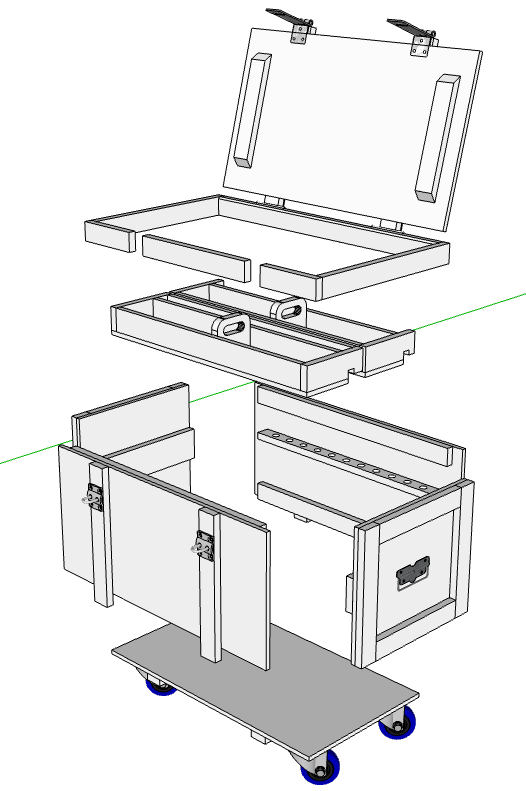
I’m not going to labour through the build sequence, as I think people can work it out for themselves. The principle is that sub-assemblies of sheet and solid materials are created for the various panels, then fixed together into a box. The exploded diagram below should help make this clearer. All joints are simply glued and screwed, no complex joinery here. This chest has been bashed around, dropped, stood on and abused. It is still as solid as the day it was finished.
To help people understand the geometry I’ve reverse engineered a Sketchup model, which you can download for free in the 3D Warehouse here. I’m not a Sketchup expert (Sketchpert?) so the model is fairly basic, but you will get the general idea. It is drawn in metric units and you can take any dimensions you want from the model.
By the way, here is the Reductionist’s Mango Box, in which I have stored my marking gauges for the last few years. They don’t all fit in the chest and this was the solution at hand. I’ve also developed a parts storage system based on Sunkist Orange crates, but we’ll save that for another time. Maybe I’ll start work on The Greengrocers Tool Chest, based on repurposed packaging from fruit and vegetables. It could be an innovation for the future when there’s no more wood left to build things from.
I’m happy to answer any questions there might be, just post them in the comments and I’ll get back to you. Now I’m off to make a full-size Anarchists Tool Chest as all my stuff doesn’t fit in this piece of crap.


So kind of you not to mention that I accidentally threw away your favorite nail punch during the Dutch Tool Chest class.
Ignoring for the nonce the omission of The Story of the Lost Nail Punch, I must say that this post is, for me, the best New Year’s Day read since back when Dave Barry was in his prime. I can barely imagine how much better it might have been with inclusion of the dramatic tale of the lost tool.
Then again, he warned us—his outfit is called Lost Art Press.