

In My First Dovetails I talked about my opening foray into the world of highfalutin joinery. And about how I then smeared my dovetailing filth across the pages of a national woodworking magazine. Since then I’ve cut a lot of dovetails, made a few mistakes and learned a lot.


I actually did OK on the first try, but I wish I knew then what I know now. If this was going to be a magazine article it would probably be called “Ten Top Tips for Dazzling Dovetails” or some such crap. But it isn’t, so it’s going to be called my Dovetail shit-list. The ten things that go wrong and how I’ve learned to stop them from happening. These are in the order I thought of them, nothing more profound than that. Some of these tricks are things I’ve picked up from other people, so this is kind of a meta-analysis with a few bits of 100% pure Edwin thrown in for good measure. Here we go.
Don’t waste time using a fret or piercing saw to remove the waste. The blades will snap like uncooked spaghetti at random intervals. A coping saw with the right blade is what you need. That blade is the Pegas skip tooth coping blade, which you can buy here (no affiliation). I’ve used both the 18 tpi skip blade and the 15 tpi regular blade. They are head and shoulders above any other coping saw blade I have used. The blade will go in your coping saw either way round, but I like it so it cuts on the pull stroke.
When chopping the sockets it’s very easy for the chisel to drift over the baseline as you chop your final cut, even if you position it correctly before striking. The answer is to cope out most of the waste first, then take very small bites with the chisel . The less material there is on the waste (bevel) side of the chisel, the less likely it will push you the wrong side of the baseline. One description I’ve read suggests halving the remaining waste each time until you can halve no further, then make the final cut. That’s quite a nice strategy to reduce the amount of waste as you near the baseline, preventing the chisel from forcing it’s way across when you strike it.
A dull chisel crushes the wood as you chop across the grain, ripping out voids in the end grain of the sockets. No-one will ever see that mind you, so it isn’t the end of the world. I have a leather strop loaded with green compound on my bench when chopping. Mine is a piece of thick leather glued to a block of MDF. Regularly give the blade a few strokes on this to maintain the edge as you work. In time you’ll need to properly re-sharpen, but this approach keeps a keen edge going for an awfully long time if regularly given a stroke. Not a bad approach for life generally actually. We all need a regular stroke.
Dovetails can be cut at any angle, including just free-balling it and cutting whatever you feel on that day. This is subjective, but in my view a steeper angle looks more striking in the finished piece. In terms of mechanical strength there is nothing much in it, so this is purely an aesthetic judgement. In the gallery at the start of this post you can see dovetails I’ve cut of various angles. Some are cut at 1:7 (and maybe 1:6, I can’t remember) using the Lie-Nielsen guide and others are cut at 1:4 with the Sterling Toolworks guide. For me the steeper angles have a bolder appearance that I like.
Don’t stress over the appearance of the baselines. Leaving them visible and planing them away are both acceptable approaches. For me I generally leave them showing, but sometimes in cleaning up the work they end up getting planed away. I don’t have an aneurism if that happens, it’s just how it is that day.
It really helps if the setting out of your pins and tails more or less corresponds to the width of chisels you have. That way you aren’t having to take a second bite at the little bit of waste your chisel didn’t reach. I’ve found these second bites can sometimes lead to a baseline with a wiggle or nick in it if you’re not really careful about the angle the chisel is presented at.
Setting out the tails is easy with a pair of dividers. At either end of the tail board, mark a pencil line across, just in from the end. I would say I generally go for 4-5mm and I leave a Double Square set to that dimension for the duration. Set the dividers to roughly the spacing needed for the number of tails you want and walk it out on the board. Don’t press hard. Now this is the important bit - the amount by which your stepping out overlaps the end line is what the width of the pin socket will be (at it’s narrowest end). Once you’re happy with that dimension, step out from both sides, this time pushing the divider points in. You can then strike lines across where the point holes fall to give your setting out. This gives you an equally divided layout with pin sockets of a known size. Much easier to do than describe, but hopefully you get the idea.
Cut the tails first. Only weirdos and gluttons for punishment do it the other way. If that offends, all I can say is stop doing it wrong, then we can be friends.
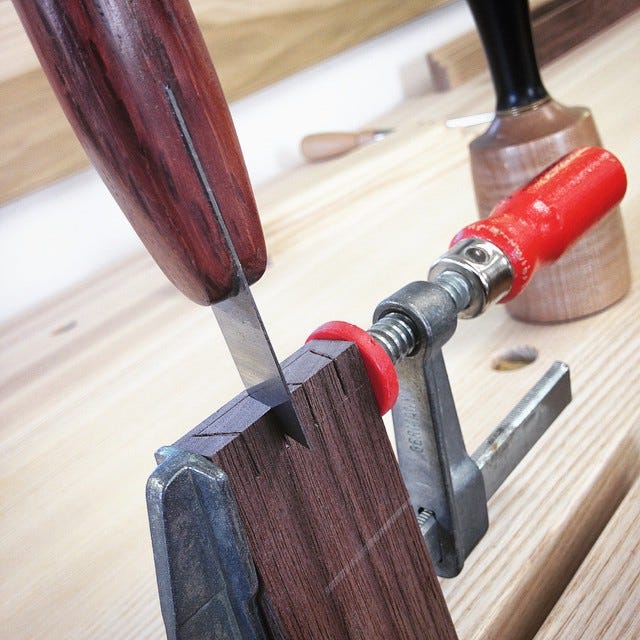
If you’re cutting half-blinds, do yourself a favour and make a kerf chisel. This is just a small piece of card scraper, sharpened to a bevel on one end and mounted in a handle. With the half-blind you can’t fully cut the tail socket with the saw. That leaves some fiddly chiselling to do. With a kerf chisel you can cut the accessible part with a saw, then place the kerf chisel in the saw cut and strike it down through the end grain to the baseline (photo below showing this). I would recommend putting a clamp across the board when you do this, as over-zealous striking can split the work. Maybe I’ve done that.
Dovetails aren’t that hard, so don’t be freaked out by them. Everyone can do it to a high standard with a little practice, so just have at it.
I intended to have cut the dovetails on the Schoolbox before posting this, but Christmas interrupts normal service a bit. That will have to be for next time. Santa might not visit me after what I said about him in the last post, but I’m sure we’ll still have a nice time.
Happy Christmas to all. I hope to continue filling your inboxes with profanity-ridden, loosely woodworking based content throughout 2023. Thanks for reading so far.
Ed
Worth it just for the kerf chisel idea. But instead of mounting a scraper in a handle, I think I’m gonna go at it by sharpening a bevel on the end of a steel putty knife with a handle that can take a modest whack. ‘Cuz I’m cheap and lazy.
" I don’t have an aneurism if that happens, it’s just how it is that day."
Is this really Ed writing this blog? This doesn't seem very "Eddie" to me.